Sony E-Mount Lens Guide Here >>

My Sony HVL-F20M Flash Review

hvl-f20m-bounce-direct

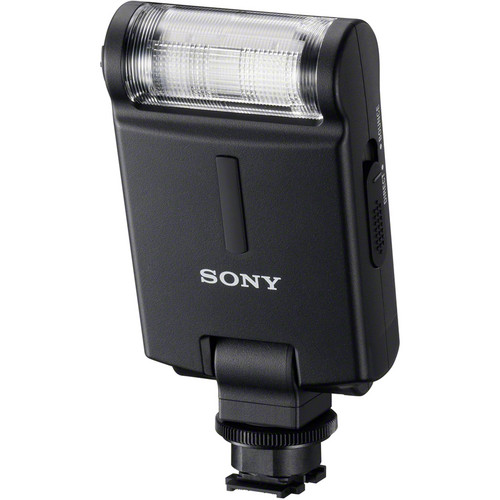
In this article I am going to go over the Sony HVL-F20M Accessory Flash unit by showing you some test shots using various flash settings and camera settings. I hope to illustrate what this flash is capable of in the real world, and how best to use it based on your needs.

The Sony HVL-F20M is the most affordable accessory flash unit that you can get for your Sony cameras that have the newer Multi-Purpose Hot Shoe. Hence, the M in the model number.

The Sony HVL-F20M flash goes for ~$148 US, and is a fair value considering the power, size, and overall results. It takes two AAA batteries and gets enough flashes to cover you for approximately 90 fires. I took about fifty shots with the flash the first few days of testing and it still charges up quick like I just put the batteries in. The recycle time is not bad either considering how small it is. I was able to fire several shots in a row with the flash with no waiting in between. After about four shots and having pretty low batteries, the flash charging light flashed and the A7r took the shot without the flash firing.

The next shot the flash fired again. This does happen when you fire fast and the flash can’t re-charge fast enough, but if you wait a few seconds it’s ready to go. The more expensive flash units can fire faster for longer periods of time due to the recycle time and additional battery power required. Those units like the HVL-F60 for example, are much larger and more expensive though.

After another day of testing the the HVL-F20M, the batteries are now close to dead. I was very close to the 90 flashes per the specs so you know. It still works, but the flash takes several seconds to charge now, which is totally normal. Only using two AAA batteries, that is not bad at all in my opinion.
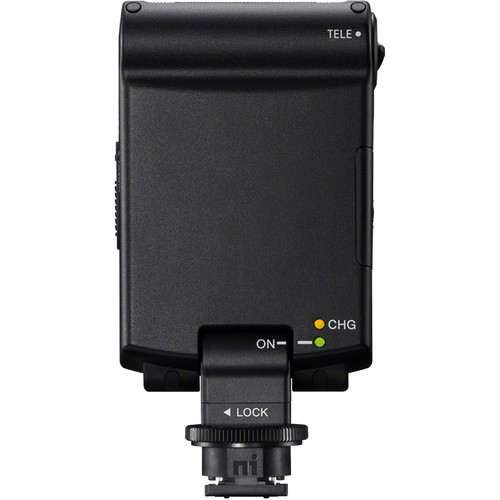
The Sony HVL-F20M folds down when not in use and powers off at the same time which is convenient and makes logical sense.

Direct Mode VS Bounce Mode?

hvl-f20m-batt-door

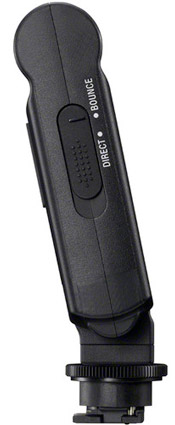
The HVL-F20M has a direct mode and bounce mode that can be changed with a sliding switch on the side of the unit. The flash head rotates inside as you slide the switch from one position to another. Direct mode aims the flash towards your subject in the same direction as your lens. Bounce mode aims the flash upward at a 75° angle. You might wonder why you would ever want to aim the flash up, but once you try it and see the results you will totally understand the advantage. Basically the small flash unit fires the light upward and it hits the large ceiling. This diffuses the flash and then the ceiling actually reflects the light back down and illuminates your subject. This “bounce” method has been around forever, but is technically a more advanced use of the flash if you have never used one before. I honestly had no idea a flash could be bounced when I started with photography, so don’t feel bad if you didn’t know.

The bottom line is bounce is much better than direct if you have a ceiling above you that is usable. Direct mode also works, but produces a much more harsh result as you will see below. If the ceiling is really high you will need to crank the power of the flash up significantly. This is normal and takes some practice to get used to. If the ceiling is not white, your flash color will have a cast of whatever the ceiling is. This may add a weird color, or it may add some warmth to the image depending on the ceiling. Usually it’s not that bad from my experience.

I remember when I was shooting a wedding back in the day and the place had a green ceiling. I was honestly not sure what would happen, and as it turns out nothing noticeable. The ceiling really did not affect the image enough for me to notice in Lightroom at the time. I have heard of this being an issue though. What I learned was the ceiling color did not seem to matter as much as I thought. The ceiling height does make a huge difference though. Inside a church for example, the ceilings are often very high! I was not sure whether to bounce the flash or fire direct in this situation. So I took a few test shots. Turns out the flash did not work in bounce mode very good, so I put my diffuser top on, and used my flash in direct mode instead. I prefer to use no flash when possible, but sometimes you have no choice. People coming down the aisle you have to use the flash to freeze the action. The light is to low for people walking and no flash. Again, practice, test shots, and checking the results on the camera was the trick. No magic or anything.

Another issue I ran into when learning about the flash was it not being powerful enough in really dark conditions and I had no idea why. Turns out I had to raise the ISO on the camera. The flash power can be amplified by raising the ISO or opening up the lens aperture. Shutter speed has no effect on flash at all. The shutter speed controls the ambient light captured by the camera and the aperture/ISO sort of limit the flash. For example, at ISO 100 the flash will only work with X amount of power, but when you raise it to ISO 200, it effectively doubles the flash power by making the sensor more sensitive to the light the flash puts out. Huh? The sensor sensitivity increases when you raise the ISO, therefore making it “easier” to see the actual flash.

So why am I telling you all this extra info? I don’t want you to get frustrated when your results might not be so good. It takes a little practice to get consistent good exposure’s from a flash when using it in a variety of conditions. If you use the flash in the same type of situation every time, you will get the hang of it really quick!

HVL-F20M Additional Photos

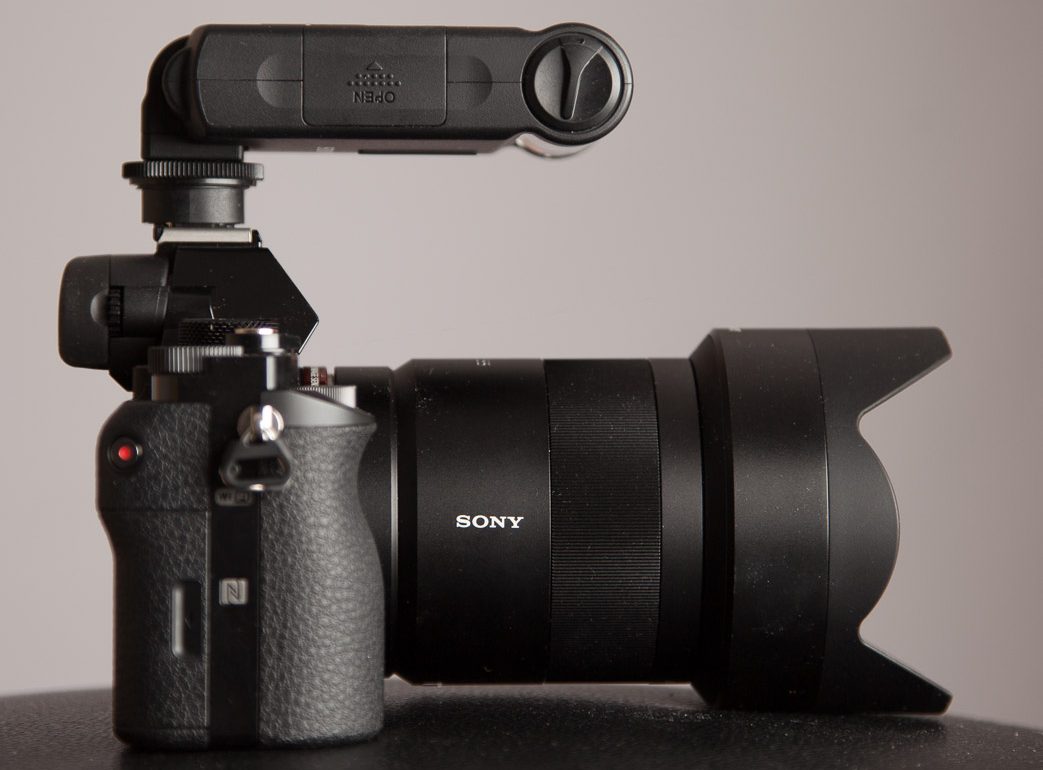
Mounted to the Sony A7r

Sony A7r w/ HVL-F20M Flash Unit
hvl-f20m-front
hvl-f20m-back

Here is what she looks like in the closed position which is also Off.

hvl-f20m-off

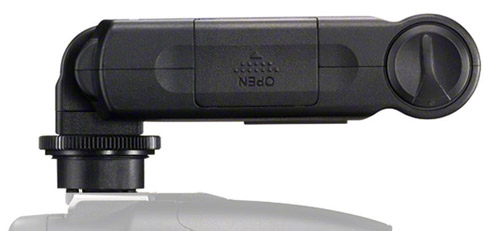
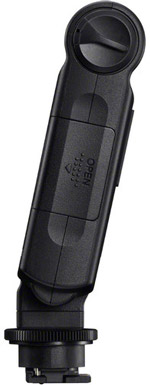
Note the turn dial on the top of the flash on the right side. That is to rotate away the extra built in diffuser to allow for a more telephoto effective flash. It’s not going to be pretty like bouncing, but it may get you a shot sharp that you would have otherwise gotten blurry. I tried fooling around with it inside, and it made the flash look even more harsh in direct mode, and slightly brighter in bounce mode. A cool feature, but unfortunately I really didn’t get to test the effectiveness of the actual telephoto range abilities. The flash also has a tightening ring on the bottom to lock it on the camera secure.

The Sony HVL-F20M External Flash is an on-camera flash that supports the use of the Sony Alpha TTL system and is compatible with Sony’s Multi Interface shoe. When compared to the built-in pop-up flash of many cameras, this flash helps to extend the effective flash working distance by providing a guide number of 65.6′ / 20m at ISO 100.

For controlling the flash exposure the Advanced Distance Integration (ADI) flash metering system works in collaboration with Alpha cameras and lenses that feature an integrated distance encoder to intelligently produce balanced results. By accounting for the subject-to-camera distance, as well as ambient light and subject reflectivity, the ADI system works to control the flash output in order to provide precise, consistent flash exposures.

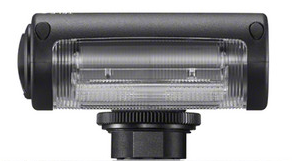
A built-in diffuser helps to control the spread of the flash; when enabled the spread is wider to suit working with wide-angle lenses, and when disabled the flash beam is narrower and longer to benefit working with telephoto lenses. Additionally, the head can tilt between 0-75° for bounce applications and greater control over the direction of the flash.

  • The HVL-F20M provides a guide no. of 65.6′ / 20m (ISO 100), which effectively extends the flash range beyond that of a built-in pop-up flash.
  • The Multi Interface shoe connection enables expanded compatibility with Sony Alpha cameras in addition to other cameras featuring a traditional hot shoe.
  • Accurate TTL flash metering is possible when used with compatible Alpha cameras and lenses that incorporate a distance encoder. The Advanced Distance Integration (ADI) flash metering system works to produce both exposure and white balance compensation regardless of background conditions. By measuring the subject to camera distance, ambient lighting, and pre-flash reflectivity of the subject, the ADI system intelligently calculates an effective guide number in order to control TTL metering.
  • The flash head is able to bounce upward to +75° in order to provide greater control over the direction and spread of the flash output.
  • A built-in diffuser helps to spread the light out over a wider range to better suit shooting with wide-angle lenses. Additionally, a tele setting enables a longer flash throw with a narrower beam in order to benefit working with longer, telephoto lenses.
  • Intuitive use is afforded through the automatic on/off function by simply raising the flash into shooting position. An easily accessible switch on the side of the flash permits quick switching between direct and bounce flash modes, and a charging lamp indicates when the flash is ready for use. The flash utilizes two AAA batteries as its power source and provides over 90 flashes when using new alkaline batteries.

How to use the HVL-F20M

So how do I recommend you use this unit? Well, the easiest way to use it and get great results is to use bounce mode with Auto ISO and the lens wide open. For example when I was using the A7r and 55mm f/1.8 Ziess lens, I had the lens @ f/1.8 and Auto ISO. It did a good job about 90% of the time I would say. When I moved more than 10 feet away I had to raise the flash exposure compensation power though. I had to actually lower the flash compensation power when I was really close to Layla as well. Again, it depends on a lot of variables and flash does a great job figuring it out most times. If it messes up, you can make adjustments to help.

If you want a more consistent result, try setting the ISO to a fixed value like 200 or 400. This will take a variable away from the camera and should provide a more consistent flash exposure. You have to also be consistent though with your distance. If the distance changes, you will have to adjust accordingly. If the light changes drastically you might have to change the settings again. Lights out for the candles at B-Day time comes to mind. I often see people panic with their camera when the lights go out 😉 Don’t panic, just take a a few test shots at home first and then you will know exactly how the flash and camera need to be set for the best exposure possible. I’ve done this many times in the past, and it’s nothing to be afraid of. Flash is scary though for some reason, and I think it’s because it generally ruins shots most of the time. That is the on camera flash though, and it’s firing directly at your subject. When you bounce the results are almost magical in comparison.

Lets get to some testing and I will show you exactly how I had the camera set for each shot.

HVL-F20M Flash Testing with Sony A7r

I needed to take a shot with no flash first, so you can see what the camera did on its own in the dark conditions.

It was really dark so the camera went for the highest ISO setting Auto ISO allows which is ISO 6400. The resulting shutter speed was then only 1/10sec when using an aperture of f/5.6.

Sony A7r, No Flash, ISO 6400, 1/10sec
Sony A7r, No Flash, ISO 6400, f/5.6, 1/10sec, Hand-held

It’s blurry, because I can’t hand-hold at 1/10sec with that lens, and the lighting looks awful.

Now look at what the camera and flash decided to do when using Direct Mode. The camera chose ISO 1600 and whatever power the flash itself used.

Sony A7r w/ HVL-F20m Flash - Direct Mode
Sony A7r w/ HVL-F20M Flash – Direct Mode – @ f/5.6, 1/60sec, ISO 1600

Pretty nasty shadows in the background and a flat harshly lit pig. It’s better than the blurry shot though 😉

Now take a look at what the Bounce Mode does in the same exact situation. The ceiling is only about 7 feet in the studio, but the pig was close to the floor, so the flash had to travel a long way up and back down for the shot below.

Sony A7r w/ HVL-F20M Flash - Bounce Mode - @ f/5.6, 1/60sec, ISO 1600
Sony A7r w/ HVL-F20M Flash – Bounce Mode – @ f/5.6, 1/60sec, ISO 1600

Pretty amazing right? I thought it was the first time I saw it years ago 😉  Anyway, no harsh shadows behind the subject and why is that exactly? Well, remember the light is bouncing off the ceiling and then coming back down all diffused. The ceiling acts like a huge reflector, therefore a huge light source that leaves no shadows. The small light source from the flash unit leaves nasty shadows in comparison and it’s really easy to see. Just like the sun pretty much.

So now what happens if you raise and lower the exposure comp? Well, Exactly what you would expect:
Less power -2 flash Exposure Compensation

Flash @ -2 Exposure Compensation

More Power +2 Flash Exposure Compensation

Flash @ +2 Exposure Compensation

As you can see the HVL-F20M works really well and is pretty easy to use in a basic situation like this.

How About a Human?

I kindly asked my trusty model Layla if she wanted to help me for a few minutes and of course she did 🙂 Surprisingly, no shadows this time using direct mode but if you’re at the perfect distance they aren’t visible to the camera. They are there, just behind Layla where we can’t see.

Sony HVL-F20M - Direct Mode
Sony HVL-F20M – Direct Mode

And Bounce mode which looks much more natural and flattering to the model. Notice how much more depth the face has with the bounce vs the direct. The direct mode shot makes her face look flat like a piece of paper.
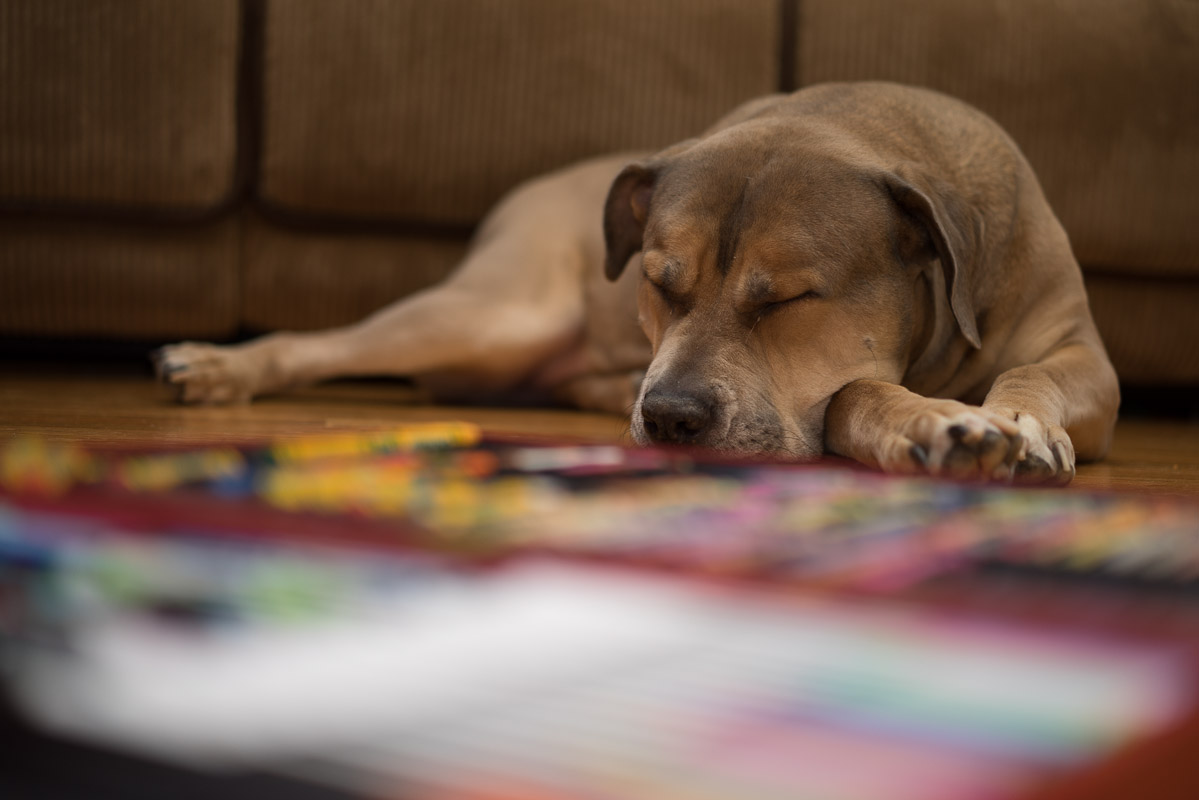
Sony HVL-F20M - Bounce Mode
Sony HVL-F20M – Bounce Mode

How About a Dog?

So Chubs was laying on the floor like the lazy beast he is, and I took advantage of the situation! Check out the Direct Mode VS Bounce Mode again. In this case direct mode was not powerful enough, and the huge white area in the foreground is most likely the cause of that. I could have tried again at +1 flash exposure comp, but switched to bounce mode instead.

Sony HVL-F20M Flash - Direct Mode
Sony HVL-F20M Flash – Direct Mode

Ah, much better! Still a little under exposed, but not near as bad as direct mode. I could easily raise the flash exposure comp to get this scene perfect, but I think you get the idea at this point.

Sony HVL-F20M Flash - Bounce Mode
Sony HVL-F20M Flash – Bounce Mode

Closing Remarks

hvl-f20m-Top

Clearly bounce mode is the way to go when using the HVL-F20M Flash if possible. Direct mode works, but as discussed and clearly illustrated above, it sucks and is harsh compared to bounce mode. So what do you do if there is no ceiling? Use direct mode and deal with the results. Remember, with no flash the shot would be blurry or super high ISO, so anything is better than nothing. Direct mode, or on camera flash, is slightly better than nothing if you ask me. It’s not flattering at all and tends to make people look scary or just bad in general. Bounce that flash and you will love the results in comparison!

You want even better results? Well then off camera flash is the next thing you need to look into 😉 It’s the best way to get professional looking results for sure, but is the most complicated and hard to learn. It’s really not that hard though and I will gladly show you guys how to do it if you want. There are so many tutorials on the web for this type of stuff though, so it’s hard to justify the time unless you guys specifically want me to do it.

I actually put together another flash tutorial a while back called Sony Nex-6 and Flash Photography ON and OFF Camera. It’s pretty thorough and explains a lot about off camera flash and using the regular Nex-6 built in flash.

Thanks again for checking out SonyAlphaLab.com and please feel free to ask questions or comment below. I always enjoy reading and responding to your commentary and questions 😉
Jay

Sony HVL-F20M Flash – $148 US @ BHPhotoVideo (Click Here)

Sony A7r @ BHPhotovideo | Amazon | Adorama

  1. Thanks for the review. Can you post some pics of what the flash looks like mounted on the camera both when it is raised up and lowered down? I’m curious to see the size of it relative to the camera.

    1. Yes Richard and thanks 😉 Any Sony camera that has the new hot shoe. Nex-6, Nex-5t, A7, A7r, A58, A99, RX10, RX100 II.
      Not the A77, A57, or Nex-7. They have the older Sony style shoe.
      Take care,
      Jay

  2. I have the same flash on my a7. Using it as a fill-flash and leaving everything on auto, I have some problem with getting the right fill. My subject would be perfectly lit but my bright background becomes over-exposed. Any recommendation on the settings?

    1. Hi Victor and than you for the comments! Over-exposed background? Do you want it to be dark? Are you using bounce mode or direct mode? If your using bounce it’s designed to light up a large area, because it’s using the ceiling as the diffuser. That is why the subject looks softly lit in comparison to direct mode. If you want the background to be darker, raising your shutter speed will achieve what you looking for. You will need to take it off Auto though. Shutter speed controls the ambient light (background) Aperture and ISO control the flash power. You can also try lowering the ISO a bit.
      If you want the background to be darker than your subject, direct mode would actually work much better, although your subject won’t look as flattering. If you use direct mode, just put your camera in manual mode and dial in the shutter speed, ISO, and Aperture. Take a shot in auto first and see what settings the camera chose if you want to get an idea. I would try 1/160sec, ISO 200, f/4 to start. manual mode is really the only way to control the flash in relation to the background exposure. If you want the background brighter, lower the shutter speed.
      I hope that helps a little and please feel free to ask more fallow up questions!
      Jay
      It really sounds like what you w

      1. Thank you for the recommendations. The scenes I was referring to were actually outdoor under bright/harsh lighting conditions so I was trying to light up the face of my subject but still intending on keeping the background prooperly exposed. I guess I really had to go manual on this but when I was using Fujifilm S5 Pro (with Nikon Speedlight) and X100 (internal flash), both of these cameras seemed to know what I want and were able to get me the result without me manually overriding things.

        1. Thanks for the additional info Victor. I think what is happening is the auto settings that the camera are choosing. I don’t quite understand how the background is being lit up outside? Do you have them against a wall or something? If so, that is pretty hard for sure, and you would just need a little fill. Unfortunately I have not tried the flash unit in this situation. In the past I would look for a shady spot instead for the portrait and then the flash works much better. You could try dropping the exposure comp all the way down and see if that works. That actuall might just do it for Victor 😉
          Take care and please let me know how you make out. It’s great hands-on user experience that I;m sure others will benefit from reading as well.
          Have a great day,
          Jay

  3. Would it be possible to use the HVL-F20M as an hand held off camera flash for Sony Nex 6, with a cord or wireless system? Any suggestions for that?

    1. Great question Henrik and I will look into it. I tried to find the answer already, but it’s proving more difficult that I thought. It looked like this solution from Sony would work, but only with the larger pro flash units. http://store.sony.com/off-camera-shoe-zid27-FACS1M/cat-27-catid-All-Cameras-Alpha-NEX-Accessories?_t=pfm%3Dapr
      I don’t think it will work with the HVL-F20M. I found other cables that will adapt to the camera and the flash, but it doesn’t have the extra pins needed for the ettl to work. Seems like Sony wants us to buy the more expensive flash unit if we want to use it off camera. The FLV-F20M doesn’t have the connector on the side. I will do more re-search and get back to you.
      Jay

      1. What do you think of this cable ? Original Carat TTL Flash Cable FC-3 Sony
        amazon.co.uk/Original-Carat-combined-HVL-F43AM-HVL-F20S/dp/B0096HTHBG

        1. Looks like it might work Andre although it looks like an adapter might be need still. Looks like the old mount in the picture to me?
          Jay

  4. My two hay pennies worth…
    Back in “the day” I used many calculations to get the lighting as right as possible the first time because photographing with film was as it was for all the reasons it was for each individual. However, today I and My Daughter are more than willing to take many shots to set up the lighting… that being one of the nifty things about digital over film (film without Polaroids). I still use those calculations now, but trial and error works good too, especially in situations where things are just very complex. So, in a nut shell, use trial and error as a tool. Clients who are human usually don’t care as long as You give Them what They are wanting/needing… and that They see You are trying for something more than just okay.
    Though it is not so easy, I only shoot flash off camera. I have a cord, and I made a handle to hold the flash. As often as I can I use a tripod for the camera, but the flash is separate and nearly infinitely variable by being hand held (with the camera being triggered remotely).
    Learn and understand the manual modes of the camera and flash. (Stated here only as an example, one of several techniques available) Being outside in full sunlight demands that the flash overpower the ambient light to get the background to go to black. Bokeh is an option, but so is a background of black.
    Recently My Daughter, a Canon user, has acquired some radio triggers. On My A57 I only get a trigger… no ETTL. No matter for I can get, as My Daughter can, some really complex lighting situations to work for being triggered by radio albeit all in manual mode.
    Note: Yes, I and others do still use sync/trigger cables. Yes, I still have to watch where I walk, but triggering studio flash as such is still a viable option. For having the “low tech” I’ve never had a client complain… or not pay.
    I do not know about most people who might do some sort of photography, but as for Me I totally enjoy learning from doing some off the wall stuff… some call it experimentation. Today is a world ahead of film; I use it to My advantage. You can too.

    1. Thanks for the comments and sharing your experiences Gerard! It’s very helpful to read what your doing with X equipment and flash units. The issue with the FVL-F20M is you can’t use it off camera with TTL as far as I can tell. I also don’t think it has the power to mute out the sun? Again, I have not tried it in full manual but I do know that takes some power! I’m pretty sure you would need at least the FVL-F43M to overpower the sun I believe. I agree, off camera flash is a way better option! A light meter also takes all the guess work and trial and error out of the equation, although it is fun to do that at times. In front of a customer is not the best place fumble around in my experience, but they do have patience if they know your work is good. If I’m going for a new type of shot for a customer I will always try and test it first with Michele or a stuffed animal even. I really don’t ever want to have a question mark look on my face in front of a customer. Even though it’s totally innocent, it does not look as professional as I want to appear 😉 I’ve been in some embarrassing moments and it’s not the best feeling to be honest. I found over time the more focused and in charge I was the better the customers responded. If I was fumbling with lights, the pose would always go to crap and people start talking etc.. Don’t get me wrong you need to learn somehow, and hands-on experience is the best way to go and fastest way to learn in my opinion.
      Thanks again Gerard for all the info and taking the time to share,
      Jay

  5. Great stuff as always Jay!
    I don’t use too much flash, usually the pop up flash is good enough for me. But I know how useful an external flash is in events and indoors.
    Other day in a wedding party, I really struggled with my NEX and the pop up flash. The direct flash was bad, bounce with the finger was awkward, the ISO and the Aperture was all messed up, the AF struggling.. I think the camera get confused if you try bounce the pop up flash with the finger, the ISO was always all way up, even at f1.8.
    The A7 don’t have flash, so I was thinking about the HVL-F20M, since its small and quite simple to use. The f43 and the f60 are huge, too much for me 😀 But I hope you review them someday.

  6. Great review Jay
    I have the a7 with f20 and external cord to use it as handheld. I am thinking of getting the f60, will there be any advantage for me getting f60 vs f20?

    1. Hi Francis and thanks for the comments/ question! Which flash cord are you using for the F20 and does the TTL actually work? I did a lot of re-search on this a few weeks ago and it looked like the the f20 would not work with a cord based on everything I read.
      In regards to your question, the F60 is a pro flash unit compared to the F20. It has huge amounts power and will recycle much faster between shots. It also has a built in LED so you can use it for a video spot light.
      The real benefit is you will be able to use the f20 to remotely trigger the f60 and therefore use off camera flash for real! I’m talking direction lighting and you can even use umbrellas if you want. Do to the size of the F60, you would also be able to light up a much larger group or room with ease. It would also be easier to fight the sun if you were trying to exposure in bright daylight conditions in manual mode. The F20 is great for what it is, but it does not have anywhere near the power of the f60. Do you need the power and extra features?
      I hope that helps,
      Jay

  7. Has anyone found any cord that will allow the use of the F20M flash off-camera (using Rx100 ii)? I’d prefer TTL, but would accept anything that triggers the flash. I don’t see why Sony doesn’t make a cord — it should be quite straightforward. Or one of the independent Chinese accessory makers. The Godox Sony cable connects to the hotshoe on the camera, but not to the F20M flash unit.)
    Thanks.

    1. Hi Lou,
      I have not nailed one down with 100% certainty. This is a really hard item to find apparently. I need to search some large Sony forums for the answer. I tried DPReview forums and found a few options, but I want a definitive model number and confirmation. I’ll see what I can find when I get a few minutes to search again 😉 I totally agree Sony should have this product easily available!
      Jay

  8. I own the hvl f20m flash, and it does work well. I wanted to use it in a multiple flash setup, and it did make the other flash go off, but it seemed to me that the other flash went off just a millisecond before the f20, even though the f20 caused it to go off. But I found that the other flash did not register on the picture. I tried and tried and tried but I could not see the effects from the off flash, no matter what f stop I used. Is there a way to make it work? Thanks for your input and all the work you put into this website. It is very much appreciated. I put the f20m on ambient/flash, and other settings as well, and it still didn’t make a difference in the result. Oh, I forgot to say that I was using the flash with my Sony A7.

    1. Hi Sharon,
      The F20m does support setting off other flash units, but they must be compatible ones. Which flash are you using as a slave? It appears the pre-flash from the f20m is setting off the slave instead of the actual flash, or perhaps the slave is not working properly. Let me know what flash so I can help further 😉
      Jay

      1. Thank you, Jay, for replying. I am using the Vivitar 283. I tested the slave by another flash, and the Vivitar 283 worked well. But it just work well with the F20M.

        1. Hi Sharon,
          I don’t think the vivitar is compatible with the Sony unfortunately. Sony uses a proprietary flash system and the slave needs to be compatible to work properly. I’m sure it worked with your other flash as it’s not proprietary. My Alien B800 studio lights would probably fire the Vivitar just fine as well. Sorry for the bad news 🙁
          Jay

  9. I can take the bad new. And, thank you so much for your help. I have the Sony F43m on order. Due to arrive in a couple of days, Lord willing. I’m really looking forward to using it!
    Sharon Berg

  10. Thanks Jay for great information. I just purchased hvl-f20 flash for my A7R, and i am struggling a little bit with flash. May be you can help me out, every time when i use flash it blinks for couple of seconds before taking picture. When you press the shutter button it lags for coupIe of seconds, if i remove flash it works fine. I don’t know why it does that, it like old point and shoot camera. May be i am using some different setups, i don’t know. Need help with this issue, Hope to hear reply from you soon.

    1. Hi Ambarish,
      The flash is going to fire a few times depending on how dark the room is. The camera needs to calculate the power needed and distances. Once it does that once in a given scene it should not need to do it over and over though like crazy. The flash mode does matter, which setting are you using? I usually use Fill Flash mode or Auto flash. Perhaps you are on Slow-sync or something? What are your other camera settings?
      Thanks,
      Jay

      1. Thanks Jay for replying. I am also using fill flash mode and my auto flash is grayed out. Cannot select auto flash. How do i check if i am on slow-sync? I also tried taking pictures outdoor in daylight still flash blinks for couple of seconds before it flashes, basically its shutter/flash delay. I am shooting Manual and Aperture priority, i shoot RAW and JPEG. What other settings do you want me to check? Hope i solve this problem soon. Thanks for your help, i really appreciate it.

        1. I’m not sure why Auto Flash is grayed out, but fill flash will fire every time the shutter button is pressed. So, it will need to fire a test pulse every time be cause it’s desinged to work in all conditions and will need to survey the scene. Auto Flash may only work in Auto Mode? Or perhaps that feature is not available on the FLV-F20M? I find that hard to believe though. I’m sorry I don’t have one on had to test and compare for you. I’m going off memory and what the manual says on the matter 😉
          “Few Seconds” Are the batteries fresh?
          Try switching to jpeg and full auto mode, then see if the flash will work in Auto? If it does, then that answers why it was grayed out. So, when using fill flash mode the flash will always fire and slow you down, basically. It’s only meant to be used when needed though, so should not really be problem in the real world. The default settings and available settings for the flash unit depend on the shooting mode it says in the manual: http://helpguide.sony.net/ilc/1420/v1/en/contents/TP0000301852.html
          I hope the helps a little?
          Jay

  11. Hello Jay,
    Congratulations on the review!
    I have a ILCE-6000 and would like to buy a flash that was better than the camera.
    The HVL-F20M is compatible with the 6000? It would be a good option or should I spend more and buy the new Sony HVL-F32M?
    The use would be for hobby!
    Thank you!

    1. Hi Snow,
      Yes the HVL-F20m would be a great option and is compatible, plus it’s small enough to fit in your pocket if you need it. It’s not the most powerful, but good enough for most hobby and amateur work I think.
      If you need more power, lighting up a whole room for example, then the HVL-F32m would be a better option! I doubt you would need that though to start with 😉
      I hope that helps,
      Jay

  12. Hi JAy
    I just bought the sony alpha 6000
    And got this flash with it.
    Whenever i use it , it blinks all the time before the final capture ….
    Does it do this all the time ? This is how it works ?
    Thank you in advance

    1. Hi Rita,
      Yes, depending on the ambient light available, the flash will need to fire in order to evaluate the scene. If you have red eye reduction on it will flash multiple times as well. If you take a few shots in a row, it should not re-meter the scene every time with pulse flash’s I don’t think. If you move the camera though, it will often times have to fire a flash to check things out.
      I hope that helps,
      Jay

Leave a Reply